Epson R2880 with Piezo inks for Digital Negatives.
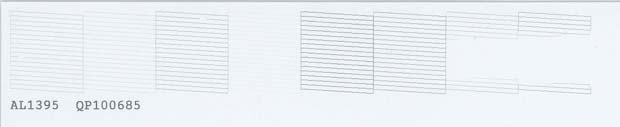
When I made the conversion from Epson Inks to Piezo inks last month, everything went exactly as expected. Ink was flowing, no problems. All of a sudden, my Nozzle Check (attached scan) shows two positions with huge gaps in the lines. I ran several head cleanings via the Epson Printer Utility - no change. I took out all the carts and cleaned the wiper blade, print heads, and capping station precisely as shown on the Piezo video (the same process I did when I first set up the printer and it worked fine), ran a few more head cleanings - and the nozzle check is exactly the same.
Jon referred me here… any suggestions? I’ve done all that I can do according to the existing Piezo documentation.
How much time passed between the initial setup when everything was working well, and when this nozzle check started?
Did you have any print head jams, or scrapes on paper/film during printing?
I would clean the bottom of the print head, following our instructions, here: http://www.inkjetmall.com/tech/content.php?133-Printer-Cleaning-and-Preventative-Maintenance
I also recommend cleaning the capping station again, paying close attention to the raised rim to make sure that’s clean in order to seal well with the bottom of the head, and make sure the capping station is flat/horizontal after cleaning. Then tap carts exit valve down on a folded paper towel before reinstalling them and do 1-2 regular cleaning cycles before printing a nozzle check to see how things look.
If your nozzle check looks the same after that cleaning, then I recommend cleaning the internal micro-channels of your print head, in the two channels that are not fully printing (M + Y on the far right).
Elapsed time not use: about 3 weeks, but I live in Santa Fe, where it’s very dry.
No jams of any kind
“I would clean the bottom of the print head, following our instructions, here”… already did that. Twice.
“I also recommend cleaning the capping station again”…did that twice as well…but I can do it agin.
“Then tap carts exit valve down on a folded paper towel before reinstalling them”… did that.
“I recommend cleaning the internal micro-channels of your print head”… I flushed Piezo Flush through each of the channels, but don’t know if this addresses your point…is “cleaning the internal micro-channels” something different?
I see you bought our PiezoFlush print head cleaning kit in December when you bought the set of refill carts and inks. This is what I was referring to when I recommended cleaning the internal print head channels. Were you having a problem at that time, or did you get the head cleaning kit to have on hand? Was there resistance when you used the head cleaning kit on the Y + M channels in your print head?
If there was not resistance when flushing these two channels in your print head, you have cleaned other parts as per our instructions, tapped carts, etc… and your nozzle check continues to look exactly the same, then I would try new carts in those positions, in case they possibly dried out over time and have restricted ink flow (?)
I bought the kit only to have on hand. Re: resistance, yes, there was some resistance in the Y channel, and when I pushed slightly, fluid squirted out of the nearby channel (on me!). I can certainly try two other carts; though, I will be leaving town in late September for 2 months and was going to use them filled with Flush to replace my ink-filled carts… I seem to recall that suggestion on your site. I guess if I use two cards now, I can get two more blank ones before Sept.
Given my resistance situation, should I still replace the carts?
If there was resistance when cleaning the Y channel, and PiezoFlush squirted out the next channel, then I question if the seal between the Y + M channels is possibly damaged, as I’ve never had this happen (and have used this cleaning kit on MANY printers over the years). Did you pull the syringe plunger UP while flushing the print head, or did you just inject?
If you’re going to use flush carts while away, then I don’t see the need to get another set of carts to try with ink- just install the set of flush carts and do a 2-3 cleaning cycles, then print a nozzle check to see how things look.
Dana, yes, I did pull the syringe plunger up, following your instructional video, “…pull [the syringe] up if dealing with a stubborn clog…”. What now? If this seal is damaged, how do I fix that? Would the most logical next step be to switch the two carts and try that first?
Apparently the Printer Gremlins were in my studio over the 4th weekend. I intended to replace the two problematic carts, but did a nozzle check first. It was perfect. I did another. Same story. I have no idea what happened, but I’m NOT complaining. Now back to printing Digital Negatives, which of course, is a whole other issue…
The Yellow cart is showing almost no lines on my nozzle check. I changed the cart, and the nozzle check is identical. I’m getting very fine horizontal lines on the top and bottom of my digital negatives, which are showing up on my Pt-Pd prints. I don’t know if these lines are related to my nozzle problem. I’ve tried everything I can think of from your videos, what now?
The yellow channel not printing well is a separate issue from the micro banding on the top and bottom of your prints.
Desktop printer models need a minimum of 1" paper margin on the top and bottom (as the paper feeds into the printer). If the image area is within the top or bottom inch of paper, you will see micro-banding in this area. To correct this, simply reduce the image size to leave at least 1" top and bottom margins, or add leading and ending strips to your film, and make a custom paper size to be able to print closer to the paper edge.
We have some info on this that may be helpful: http://www.inkjetmall.com/tech/content.php?147-Piezography-Gloss-Printing-Tips
If you have the same results from your yellow channel with a different cartridge, then I suspect the print head channel is dirty or dried, causing clogging/restricted flow, though I would be surprised if your head clogged since you last wrote on 7/7, though I know your environment is very dry, so it’s certainly possible…
Since installing a new cart in the Y channel, how many cleaning cycles have you done? Is the cartridge air vent hole open? Have you tried flushing the yellow print head channel with your print head cleaning kit?
Yes, Jon told me about the micro banding, which I solved by going to a larger size sheet of Pictorico.
Re the Y channel: After multiple head cleanings, and ignoring the printer for 24 hrs, the nozzle check came out OK. Then, after a few more head cleanings, it was perfect. Now if I leave the printer for a few days unused, or don’t do a head cleaning, I’m back were I was: a clogged Y channel. So, I do a multiple head cleanings, leave it for 24 hrs, do a few more cleanings, and it’s good again. Seems like an odd process, but with lots of attention it seems to be manageable.
HOWEVER, all these head cleanings is devouring the ink, so I have to regularly fill the carts, do MANY head cleanings after the carts are newly filled (which of course then drains them even more), and then repeat the whole process. Seems like an awful lot of spilt ink, and work, to print my Digital Negatives. Most of my ink seems to be going toward head maintenance instead of prints!
I’m glad your micro banding is resolved, and your yellow channel has returned, though it’s strange that it drops out after a few days without use… this certainly isn’t normal, though I remember you said flush came out the M channel when you flushed the Y channel in the head, so I wonder if there’s an issue with your yellow channel (?) Are your capping station and wiper blade clean and straight?
RJ. I seem to be having some of the same bad experiences as you. Having severe blockage issues at the moment that I cannot budge. See my other thread. Jon told me that perhaps a Piezo system isn’t for me as I don’t have a huge workflow. However I thought it would be OK if I kept on top of things in the way you describe. Somebody suggested to print a nozzle check pattern every day just to keep the ink flowing through. Judging by what you have written this may not be enough to keep things from drying up though. I think persevering by buying £300 more ink could have been a bum move. Problem upon problem is persisting
Dana, I am also seeing piezoflush forced up out of other nozzles. In fact last time I pushed piezoflush through a stubborn channel it squirted back up out of two nozzles. You say there is a seal between channels. Could these seals have been damaged when I turned my printer on while back paper towel remained under the print head? (detailed in other thread). Where do these seals exist? Thanks.
P.S if my printer is damaged Epson refuse to service it because I have been using non-standard inks!
RJMang~ I am curious if you were to switch the chips on the Y and C carts, and install them in the other positions, if the problem would follow the channel or cartridge. Are you currently printing more matte or negatives?
I have used our PiezoFlush print head cleaning kit hundreds of times on dozens of different printers and models, and have never had fluid come out a different channel when flushing one channel… With that happening, I suspect your print head is old/worn out or damaged, or you have a severe clog.
Many Epson techs will work on a printer that uses non-OEM inks/carts, but some will require Epson carts be installed.
Dana, re: your question on my printing… I only print Digital Negatives. Also, I tried using a new Y cart, and the problem was identical with the new cart, so the problem seems to be the channel.