I recently purchased two refillable 3880 cartridge sets, one dedicated to flush, and the second dedicated to K7. The flush set worked perfectly at first. When I installed the K7 set, my 3880 wouldn’t recognize any of the ink carts. I ran the reboot protocol several times, and inspected to insure 18 OEM chips are oriented properly. I tried pushing the carts up from the back. There is no apparent damage to the chip readers. However, I found that one of the small clips holding the reset chip onto the carts were missing on both of the LK carts. When I reinstalled the flush set, my 3880 now fails to recognize any of the flush carts. I now have two cart sets down for the count, what should I do next?
What happens after you go through the reset procedure? Do the cartridges recognize after this procedure?
Do you have any OEM cartridges on hand for testing purposes?
What is the error exactly you are receiving on the LCD panel?
I’ve tried the reset procedure on both sets, the same message “x no ink cartridge, install ink cartridge” appears. At the bottom of the LCD panel 9 cart symbols are flashing marked with a diagonal slash across each cart. The maintenance cart is good to go.
I recycled the OEM carts that supplied all 19 of the OEM chips, however, I have a new set of OEM carts installed in a second 3880 printer.
Ok, it sounds like you have a bad fitting cartridge in the group, there may be more then one, so to determine which it is please do the following:
Remove ALL 9 Inkjetmall Carts, install ALL 9 OEM carts that are currently in the other printer. You are going to want to trick your Cartridge door sensor with a thick/folded piece of paper to get the printer to think the cover is closed. Once you have the cover sensor tricked and all 9 OEM carts installed, you are going to want to take one out at a time, starting on the one side or the other and install the refillable cart, 1 at a time until you see the no cartridge recognized symbol again. This will indicate which cart is ill fitting, at which time you can start to diagnose how to repair the cart to fit properly. Push the cart in, if this makes the printer recognize then affix a layer (or 2 or 3) to the top of the cartridge at the indentation directly behind the control chip area, this will allow the cartridge a nice snug fit into the printer so the chip read sensor can read the chip properly. If pushing in doesn’t work, try to push the cartridge UP/DOWN from the bottom, if this gets a recognition then apply 1-6 layers of masking tape to the bottom of the cartridge until the chip read gives you a recognition.
This is a matter of “plug n play”, you are fortunate to have OEM carts on hand for this procedure, it will make the diagnosing that much faster.
Keep in mind, when you have the OEM carts installed and they are being recognized, the printer is going to want to run through a start up, DON’T allow this to happen, otherwise you will risk introducing color ink into your K7 system. Instead, quickly pop out the cartridge to be tested and install the refill cart then proceed.
Let me know your results,
Kindly-Kelly
I moved the OEM set from my color 3880 to the black and white printer. The OEM carts are not recognized. I moved the OEM set back to the color printer, that printer recognized the carts. The flush carts are back in the b&w printer and are not recognized. What to do next?
With the OEM carts installed perform the reset procedure and test from there as explained previously:
3800/3880 printer reset:
If your printer displays empty cartridge boxes on the LCD or other strange errors, the printer can be reset as follows. Open the cartridge bay door and unlock all nine carts, then slide out the waste ink tank and turn the printer power off for at least 3 minutes. When the printer is turned back on, the LCD will display “NO maintenance tank”. Slide the waste ink tank back into the printer and close the waste tank door. The LCD should now display “NO ink cartridge”. Push cartridges snugly into the printer from left to right (1 to 9), then lift up on the bottom/rear of all carts to ensure they are even. The LCD should now display “Cartridge door open”, close the cartridge bay door and the printer should pressurize cartridges then display “Ready” on the LCD panel.
I’ve been running the reset protocol you mention several times since Sept 23 with all three cart sets; flush, K7 and OEM. This is my frustration, my printer will not recognize any of the cart sets since installing the K7 set. Both the OEM set and flush set worked well prior to the K7 installation. I’ve run the reset procedure again this morning just for kicks. Still no recognition.
Is there any chance this printer would still be under the 1 year warranty? It’s sounding like a software issue within the printer itself. After installing the OEM carts and running the reset procedure, the printer should have recognized the cartridges. I am at a dead end road for suggestions, if the OEM carts don’t work and you can’t get your printer to Reboot the software, there really is no where else to turn, except Epson.
There is a possibility you installed the wrong OEM chips under the control chips and confused the printer, BUT you would have been able to Reset the printer in that case. We don’t have a starting point if we can’t get the printer to even start the recognition process.
Hi Eric~
Your situation is very strange, and the first I’ve ever heard of a printer acting like yours. I’m going to jump in to try helping you resolve the problems you’re experiencing, and have a few questions.
- Going back to the beginning: you said the set of flush carts worked well at first. What type of cleaning cycle did you preform to flush your printer? Was the printer on and still recognizing the flush carts after cleaning?
- Did you have any problems removing the flush carts from the printer?
- About how old is printer #1 that is giving errors? Did you buy it new, refurbished or used/private sale?
- When you turn the printer off, please also disconnect the printing (USB/eithernet) and power cables. Wait about 3 min, then plug in the power cable (leave the printing cable unplugged), and turn the printer on.
- When you do the printer reset procedure: when you turn the printer on with all ink carts removed, does the LCD panel display “NO cartridge” flashing all 9 positions? Watching the LCD panel while pushing each OEM cartridge into the printer, does the message change to “Ink cover open” after all 9 carts are locked in, or does it still say “NO cartridge”?
- Did you do anything to the chips before reinstalling the set of flush carts into the printer (after the initial error with K7 carts)?
- With the set of OEM carts in the first printer, please remove the waste ink tank and install the tank from your second printer, then close the door and see how the LCD printer responds.
- (Please check to make sure all reset chips are flat/flush on top of carts before inserting carts into printers first): With your second printer that is set up and “ready” with OEM carts installed: please open the cartridge cover and remove cartridge #1, then install the corresponding flush cart, and add a paper wedge to trick the printer into thinking the cartridge cover is closed (to avoid closing/opening it with each cart). Check how the printer responds on the LCD panel, then repeat with cartridge #2, and so on until the whole set of flush carts are installed in printer #2. If you get an error after installing a flush cart, remove the last installed cart and reinstall the OEM cart in that position, and the printer should return to “ready”- leaving that OEM cart installed, install the next flush cart until you have gone thru all 9 carts.
Please let me know if you have any questions and your results.
Thanks~ Dana
-
I removed the OEM carts and ran two power clean cycles. The carts were all recognized after each cleaning. I successfully printed several nozzle checks over a period of several days with the flush carts installed.
-
Flush carts 1,3,4 and 9 are difficult to remove. Position 1 is especially difficult. Fearing damage to the chip readers, I have inspected using a flashlight. The internal workings appear to be in good shape. The LK cart is missing one of the small plastic clips that holds the reset chip into place above the OEM chip. For the K7 set, positions 6 and 9 are difficult to remove. I have the impression the carts are catching on the grey release tab. If I continue to push the grey tab down after the cart springs out, the carts seem to release with less difficulty.
-
I purchased the printer from a fellow in Seattle. The print count is 120. I don’t know how old the printer is. The ink pump assembly was broken in transit, with repairs made by an Epson
authorized shop. -
I ran the procedure with your cable management suggestions, still no recognition.
-
Yes, the LCD panel display shows “NO cartridge” flashing all 9 positions. The message “Ink cover open” dose not appear.
-
I do not recall doing anything to the chips.
-
“NO cartridge” flashing all 9 positions remains the same. However, the waste ink tank indicates it is new. The other waste ink tank is near the end of its cycle.
-
Positions 1,2,3,5,6 and 9 show “ready” with the flush carts in place. Flush carts 4,7 and 8 gave enough resistance when an install was attempted that I pulled back. It seemed that too much force would be needed. OEM carts for position 4,7 and 8 are in place along with 1,2,3,5,6 and 9 flush carts, the LED screen reads “ready” although they all read empty.
I’ve gon ahead and reinstalled all 9 OEM carts, and all is well. The carts now indicate they are full.
I’m not getting e-mail notifications when responses to this thread are made.
To follow up, I used packing tape to secure the reset chips on all of the flush carts. It turns out that positions 4,7 and 8 were difficult to install because of the tape job. Once re-done, the flush carts were easy to install. I was able to install all 9 flush carts in the second printer, they were recognized and the printer showed “ready”. I then installed the flush carts in the first printer. The first printer is again showing “NO ink cartridge, install ink cartridge”.
So, just to be clear, you installed the OEM carts into this printer that was giving you grief and you finally got a full recognition of all the carts? Then you installed the Flush carts that you couldn’t get to recognize in this 1st printer into the other printer and got them to recognize? THEN you swapped the carts again between the printers, after fixing the taping issue and ended up with the same exact problem again???
I know there are a lot of moving parts here, my apology. The best description of my current state of affairs is this;
- 9 flush carts and 9 OEM carts are currently recognized in the good printer.
- 9 flush carts and 9 OEM carts were working properly in the bad printer before I installed 9 K7 carts.
- When I installed the K7 set, they were not recognized in the bad printer.
- I then discovered that none of the flush carts nor any of the OEM carts are recognized in the bad printer.
- I have been afraid to install the K7 set in the good printer because installing the K7 set seems to have killed the bad printer.
- The bad printer accepted the OEM and Flush sets perfectly well prior to the K7 install.
Hi Eric~
Thanks for the additional information. I’m glad to hear the set of flush carts are recognized in your “good” printer, and makes me suspect a sensor or other electrical component is damaged in your “bad” printer after installing the set of K7 carts. I’ve never heard of this model cartridge causing damage to a printer (except when a reset chip wasn’t pushed down all the way, and bent the chip sensor when the cart was installed), so I would like you to not install the K7 carts in your “good” printer, and send me some photos to check if I can see anything that could have caused your problem. In my experience, if one of your printer’s chip sensors was damaged, I would expect you to get a “no cartridge” error with that one position, not all 9, which is puzzling… and makes me suspect something else is going on.
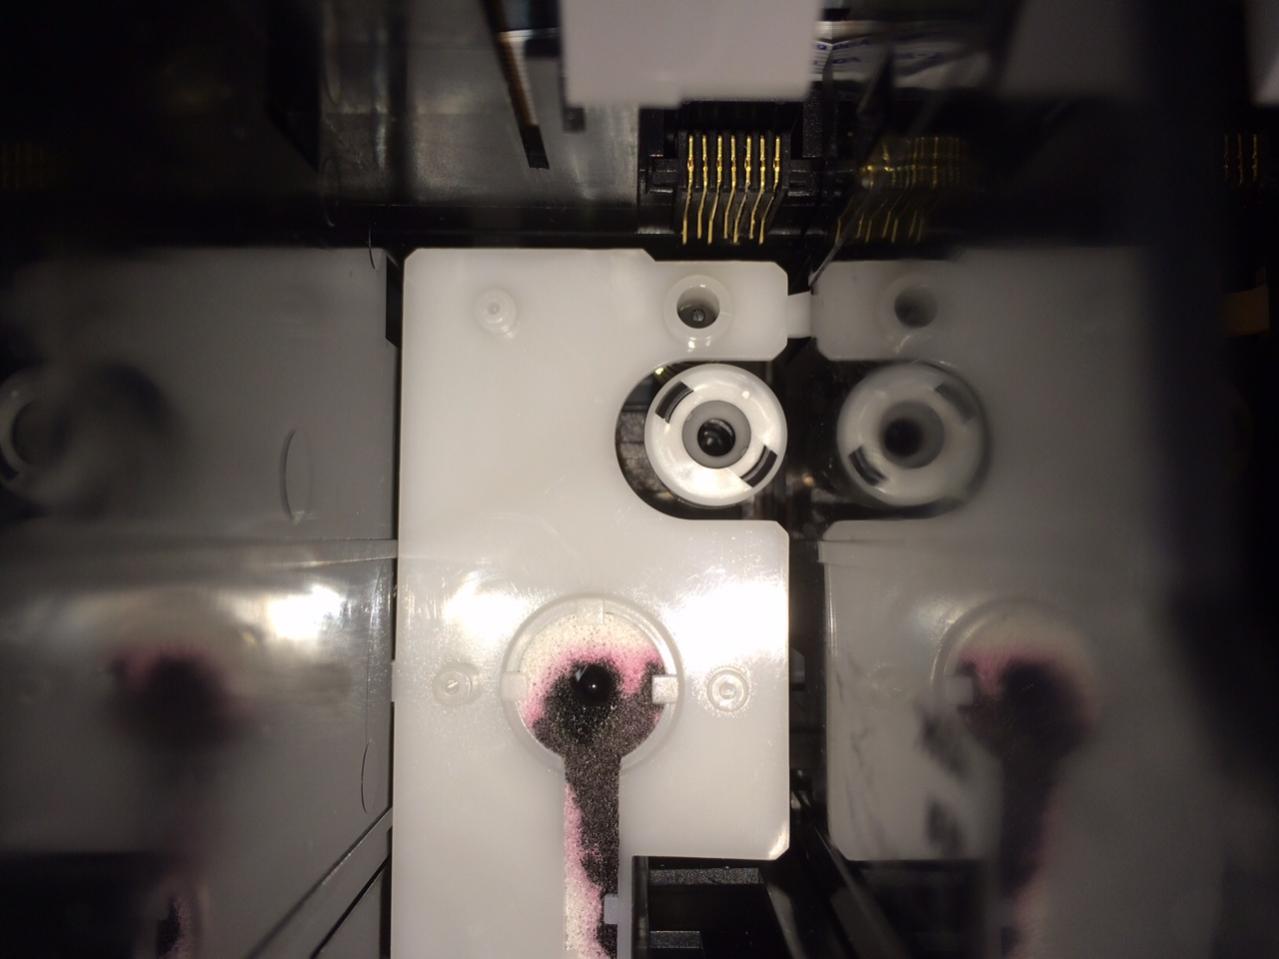
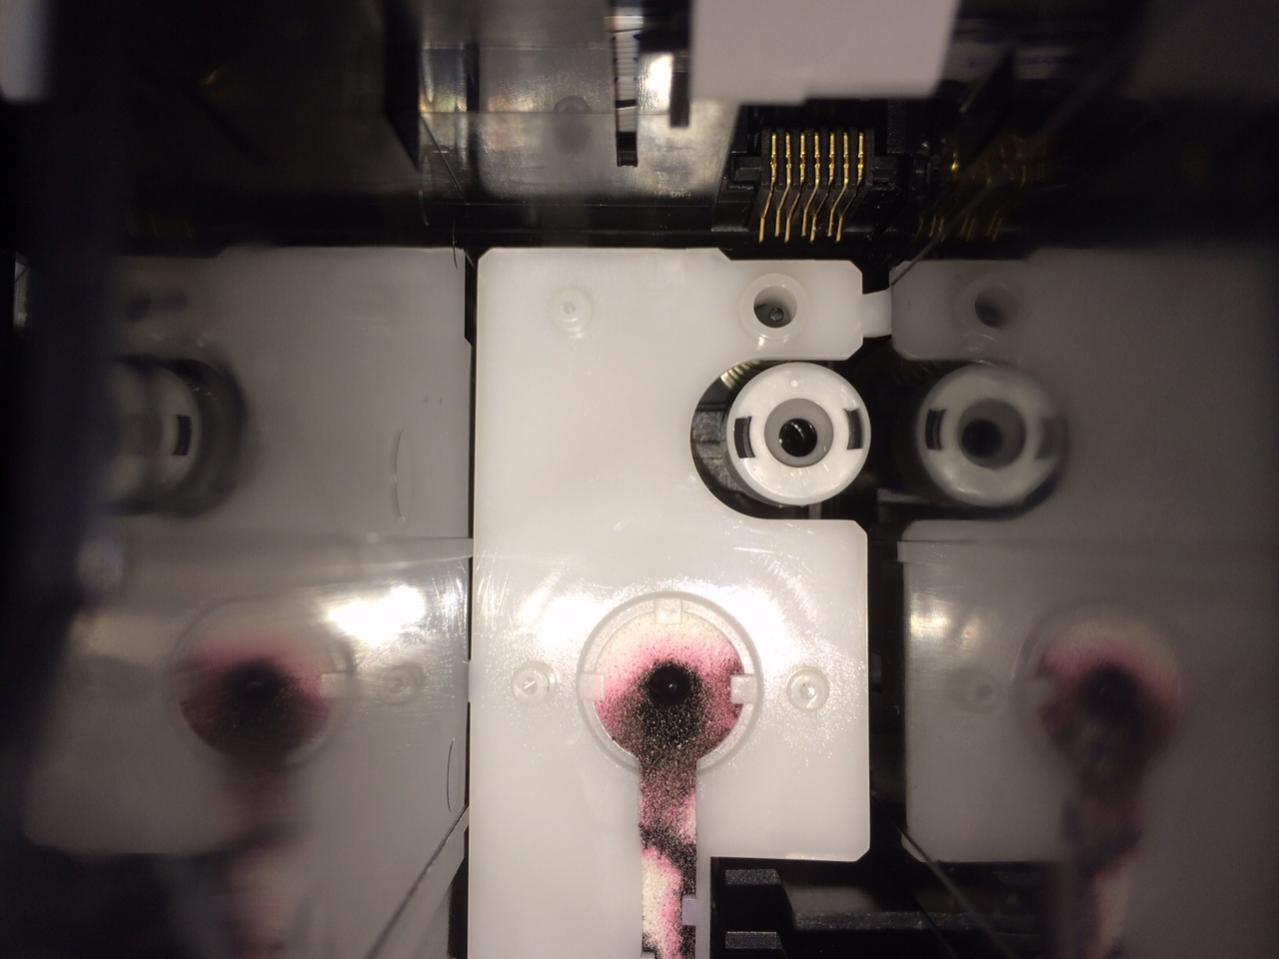
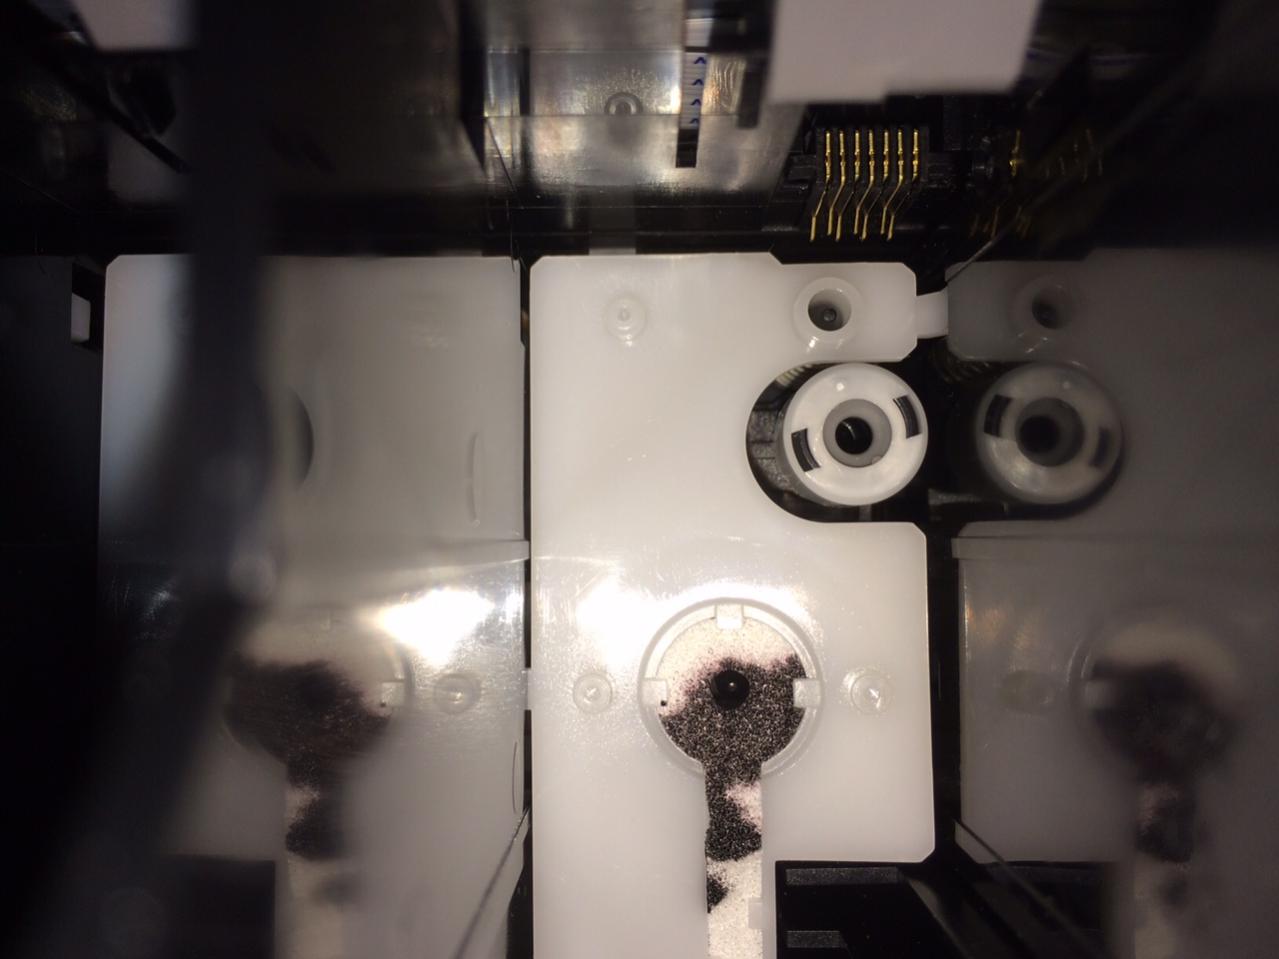
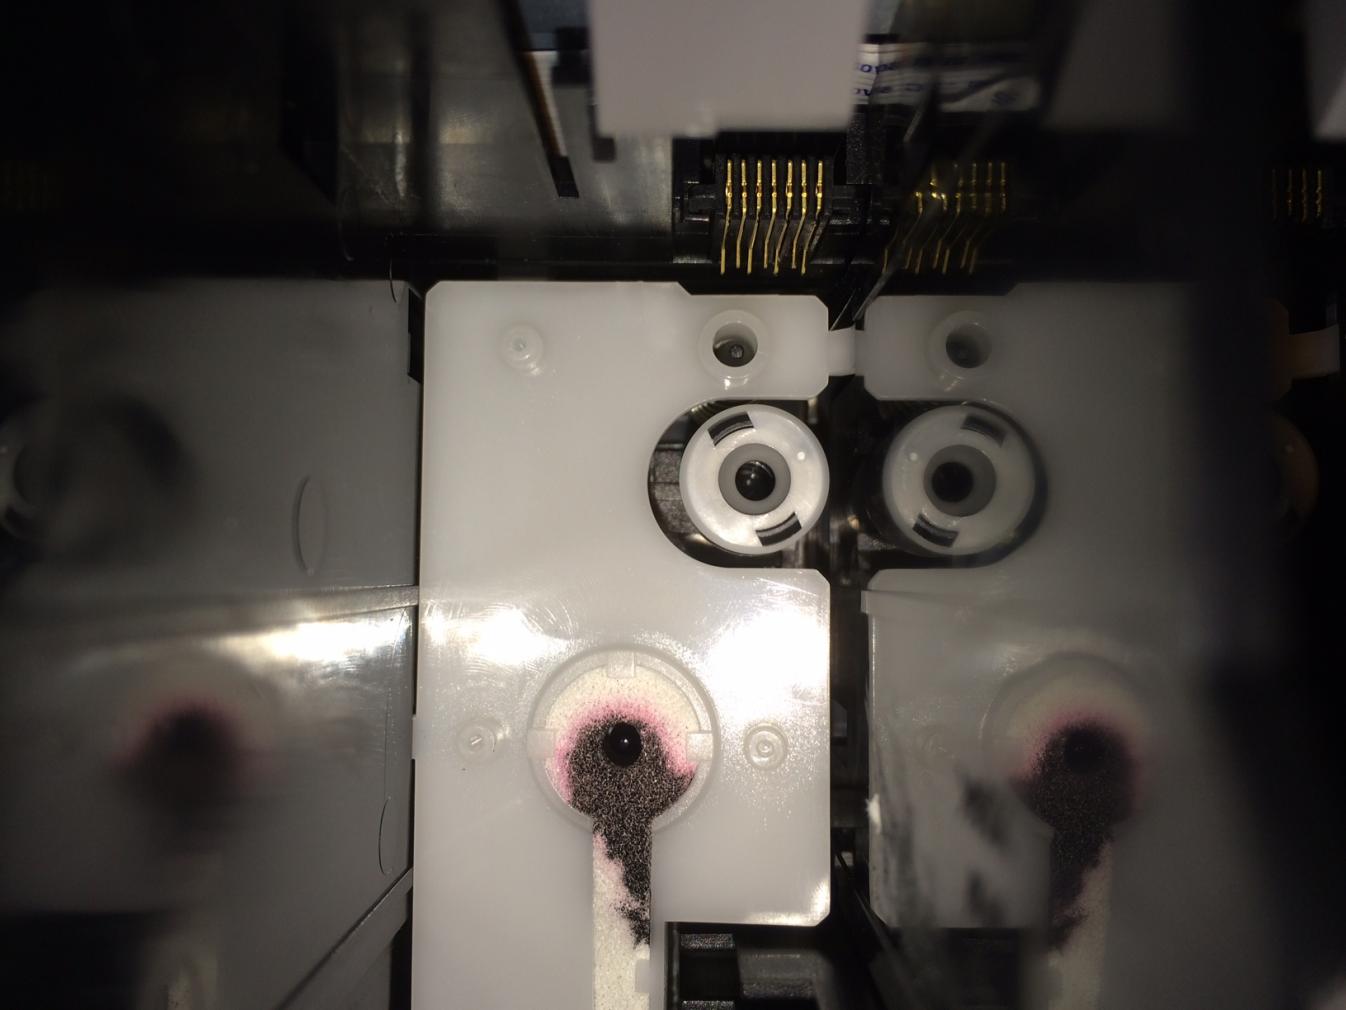
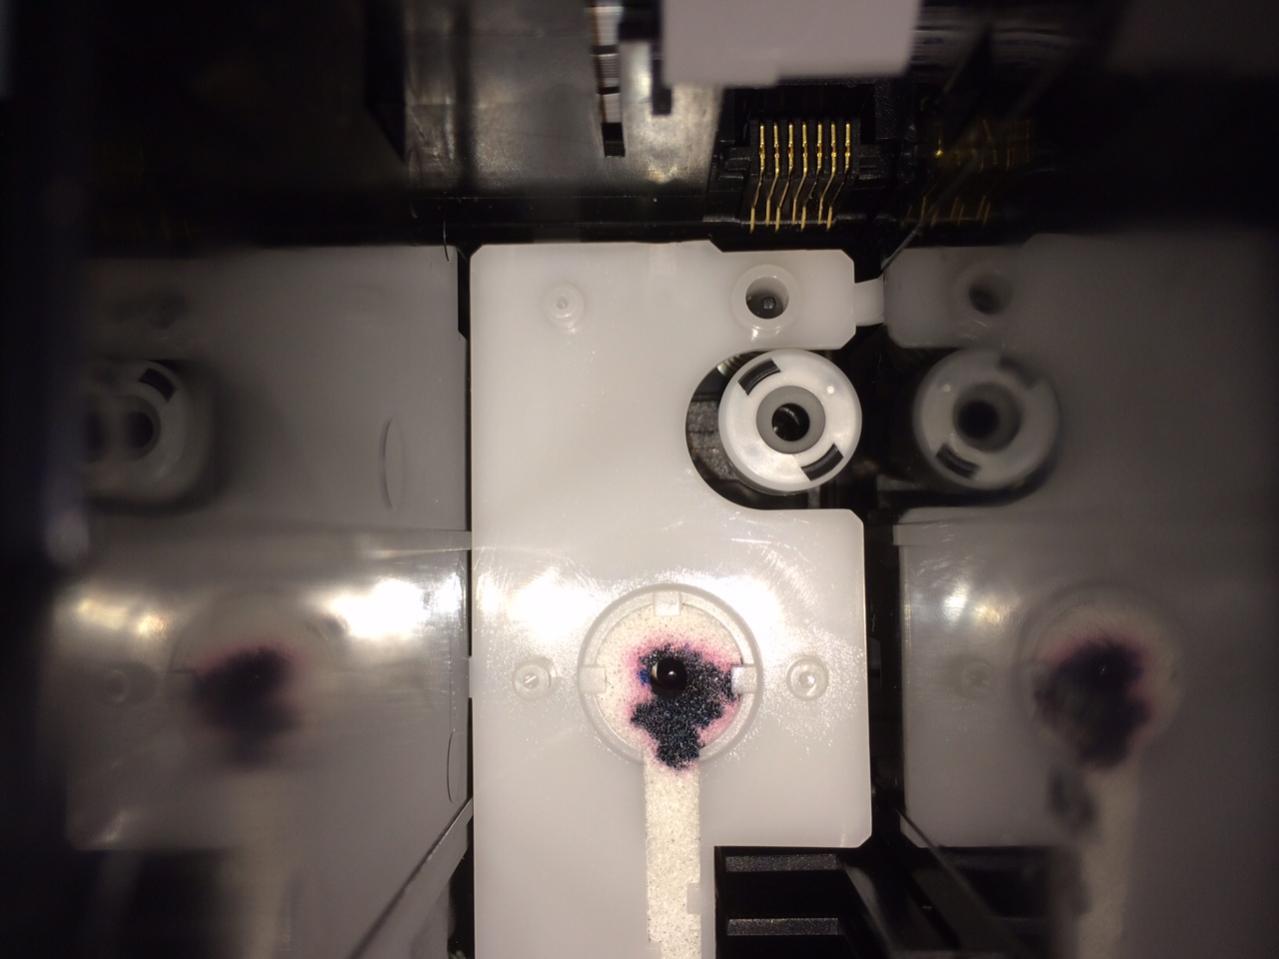
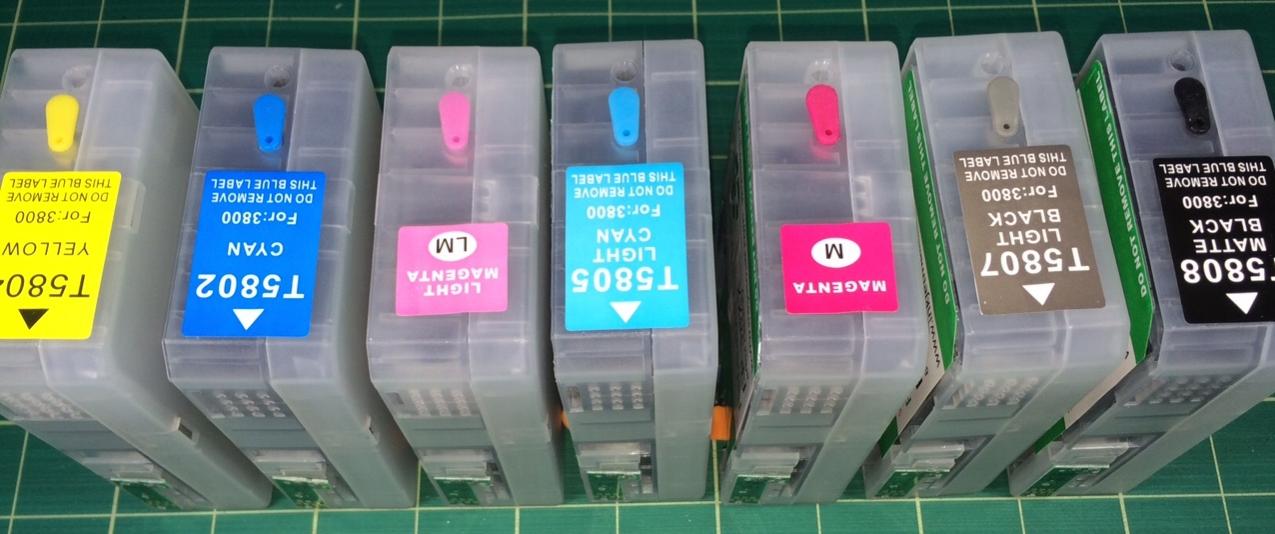
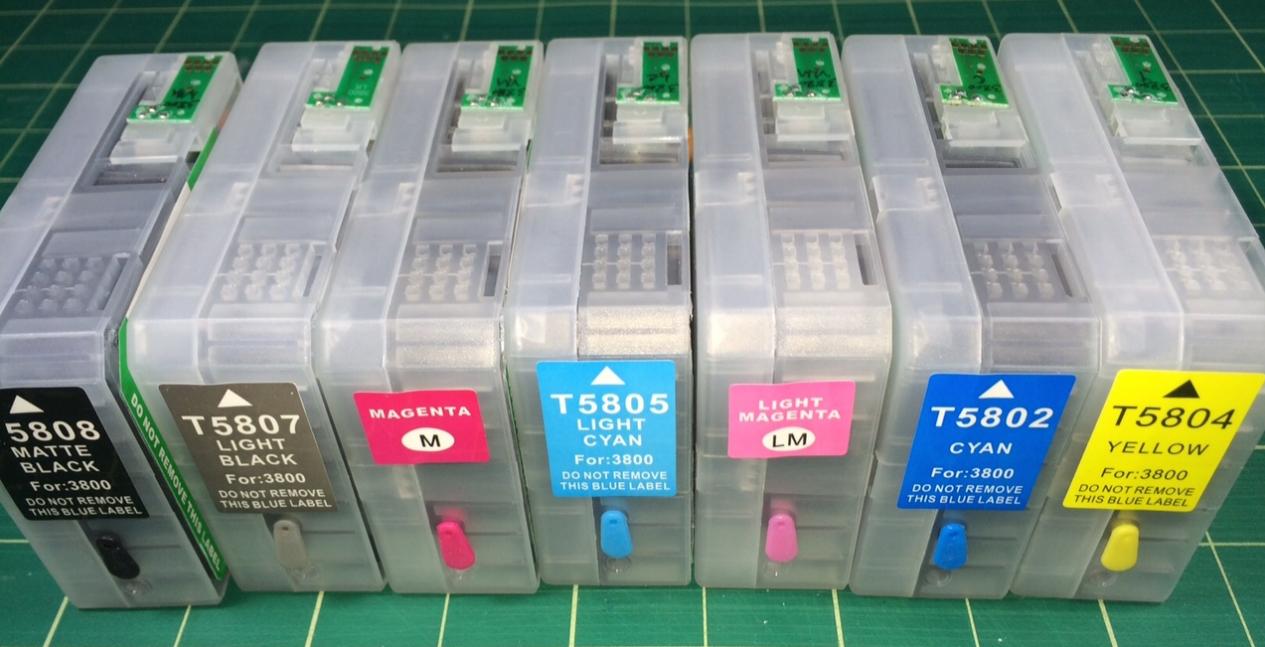
It would be helpful if you could please take some photos so I can see your set of K7 ink carts, with all 9 carts lined up, photograph from the front end so I can see how the chips fit on the carts. Also, with all carts removed from the problem printer, using a flash or flashlight, photograph inside the cartridge chambers showing the top area where the chip sensors are located, so I can examine/compare your printer’s sensors.
Yes, sometimes carts don’t pop out of the printer, but gently pushing the gray unlock button while pulling the cart out will make it easily slide out (yes, it’s getting caught on the gray locking lever).
Carts should not be difficult to install into the printer (you’re right to not force them if they don’t go in easily).
Best~ Dana
Hi Eric~
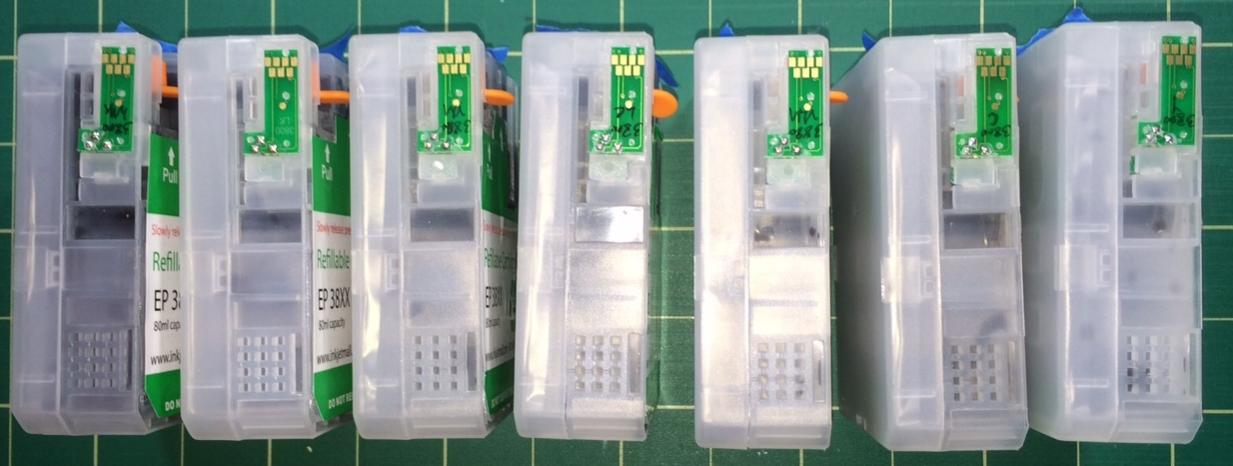
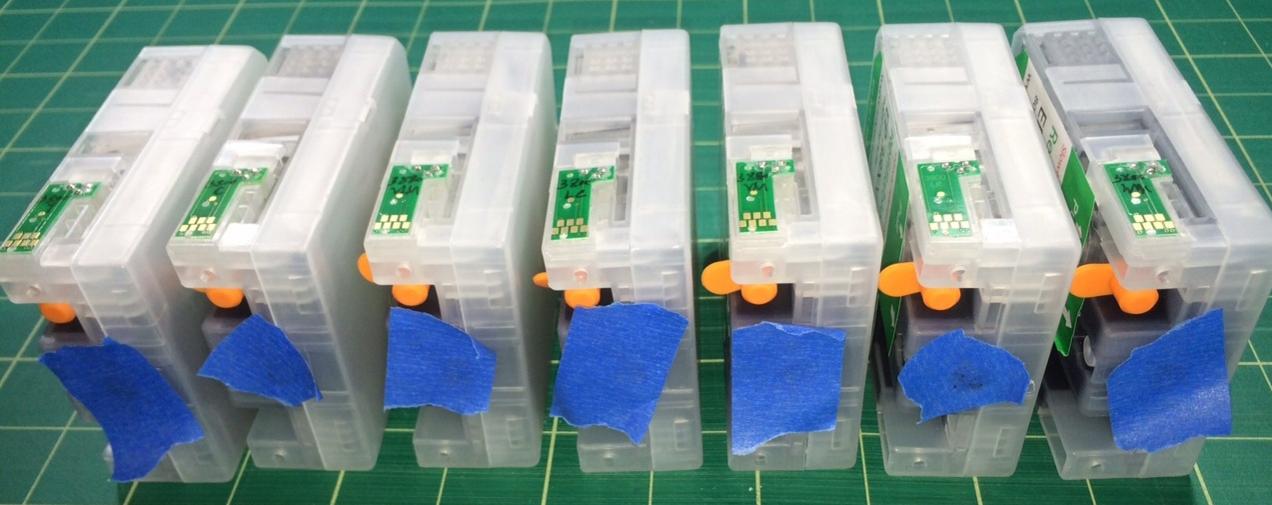
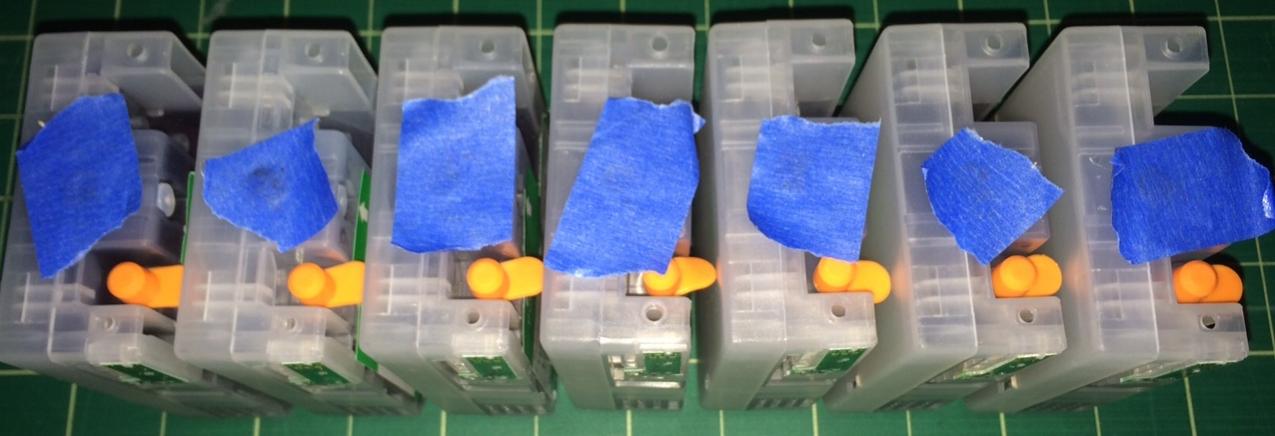
Thanks for the photos, they are very helpful to see. I have attached the pics you emailed of your carts/chips:
From your photos, it’s hard to tell the condition of your chip sensors (they look crooked/bent in the photos, but when I look at our 3880s’ sensors, I see they look this way when viewed at an angle, but are straight when viewed straight on). Please look at the printer’s chip sensors straight on to see if the individual wires are straight or bent/crooked.
Why did you photograph 7 of the set of 9 carts? Are you only doing matte printing, so using the PK and LLK carts from your flush set?
Examining the cartridge chips in your photos at different angles, it’s hard to tell exactly, but it looks like the C control chip is raised off the plastic base in the back (in the bottom two photos in the post above, the back of the C chip looks up, so I can see the top of the pins underneath).
Thanks~ Dana
This is what they should look like when viewed straight on:

This whole situation is perplexing, this is not something we have experienced before or have had any customers experiencing this problem. The only logical explanation is the chip read sensor were damaged when you applied packing tape to the top of the control chips as stated in post #11. This is certainly not a recommended procedure to take when cartridges are not recognized.
Do all of your chip read sensors look like the image I posted?
Hi Dana-
When I compare the chip sensors in both of my 3880’s, all 18 sensors have the same appearance. Is it fair to conclude there is no damage to the sensors because of this uniform appearance?
The reason you see 7 carts instead of 9 is because I’ve been using two carts from the flush set when installing the K7 set. Some of my online research suggested this may be causing a problem.
I started with two full sets of OEM chips. One set was four to five years old, the other set was one to two years old. Is is possible that using seven older OEM chips for the K7 inks combined with two newer OEM chips in the flush positions has caused this? One online source I read suggested that Epson changes the OEM chips from time to time and that mixing them may cause a failure.
The C control chip is raised off the plastic base.
My apology for trying the tape job, it was a YouTube suggestion made by another tech using alt ink sets that sent me down that road. The suggestion was intended to solve poor cartridge construction issues, specifically that the clear plastic end of the reset chip assembly (not the end with the green chip board) does not snap into place with precision sitting askew or slightly higher than the base. While the tape job (post 11) did not solve the “no recognition” problem but I don’t see how this could have caused the initial problem (post 1). Can you explain this for me?