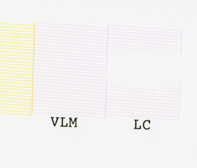
I’m sorry to hear you’re experiencing a problem with your LC channel printing fully, and appreciate that you attached a nozzle check for me to review. I see you originally purchased the set of refill carts and ConeColor ink bottles last Summer, and have ordered a few refill bottles since then, so I assume things have been working well and you have been happily printing until this started recently.
I have some questions to get a better understanding of your situation, and the answers will help me determine the cause and solution for your problem.
When did this first start?
Did the LC stop fully printing after the printer sat unused for a period of time, or during regular printing?
If this occurred during regular printing- did you experience a print head strike on the corner or edge of paper before this started?
If it started after the printer sat unused, about how long did the printer sit?
Did the center LC nozzles slowly drop out until it got to this point, or did the center section suddenly drop out at once?
How are all the other channels working?
What is the temperature and humidity levels in your print environment?
Please let me know so I can try to help resolve this for you.
Best regards~ Dana
The printer is in pretty much constant use except for Sunday & Monday on which we are closed.
The problem occurred all at once in the middle of the week and between print jobs on the same day.
There was no head strike that I am aware of.
The temperatures have been warm outside but we are air conditioned and hold at about 70f.
The relative humidity has been high at times. 80% plus.
The other colors are working perfectly according to the nozzle check pattern.
I appreciate any help you may be able to provide.
If the head is indeed gone, it is likely that we will replace the printer. The head replacement cost is quite ridiculous.
Thanks
Allen
[QUOTE=Dana-IJM;1552]Hi Allen~
I’m sorry to hear you’re experiencing a problem with your LC channel printing fully, and appreciate that you attached a nozzle check for me to review. I see you originally purchased the set of refill carts and ConeColor ink bottles last Summer, and have ordered a few refill bottles since then, so I assume things have been working well and you have been happily printing until this started recently.
I have some questions to get a better understanding of your situation, and the answers will help me determine the cause and solution for your problem.
When did this first start?
Did the LC stop fully printing after the printer sat unused for a period of time, or during regular printing?
If this occurred during regular printing- did you experience a print head strike on the corner or edge of paper before this started?
If it started after the printer sat unused, about how long did the printer sit?
Did the center LC nozzles slowly drop out until it got to this point, or did the center section suddenly drop out at once?
How are all the other channels working?
What is the temperature and humidity levels in your print environment?
Please let me know so I can try to help resolve this for you.
Best regards~ Dana[/QUOTE]
From what you explain, it sounds like you may be dealing with a scratch or something on the bottom of the print head that is effecting ink flow of that position recently.
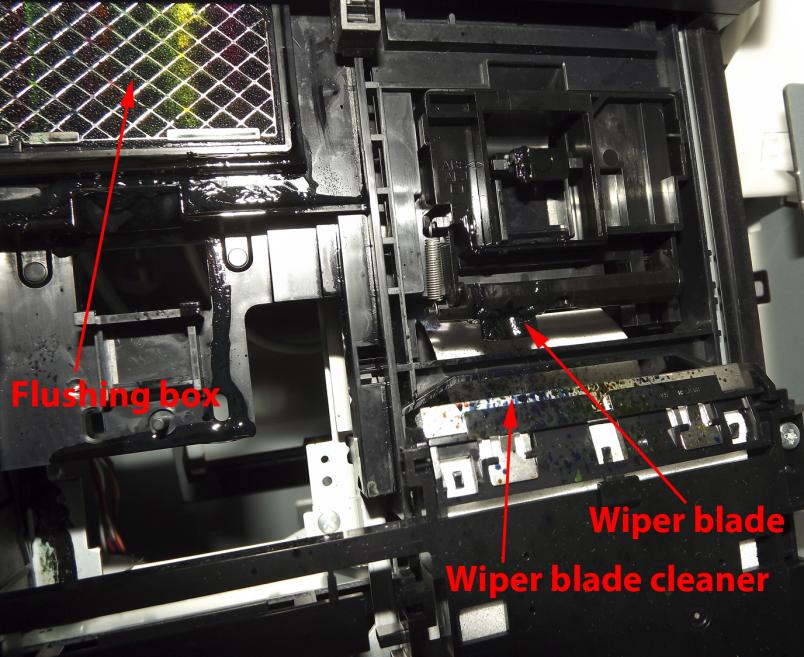
Generally, restricted flow caused by a blockage in the ink line or damper would start as a few missing nozzles here and there, then get progressively worse over time until the entire position is blacked and not printing. Only a blockage in the print head its self would show the exact same nozzles missing, and can occur suddenly if the print head surface is scratched, dirty or damaged somehow. These newer printers were designed to not be easily cleaned/maintained or repaired by the user, so many of our standard cleaning techniques don’t work, or aren’t the same as with other models. Yesterday, I dove into the capping station assembly of our 7900 to get some photos and more information to help people like you who need cleaning information/assistance with these models. This entire area is very different compared to previous models- there are many new sensors and moving parts. I recommend cleaning your printer’s capping stations, flushing box and wiper blade by following the instructions and photos below:
To move the print head out of locked right side: either turn the printer on, then unplug power cable while print head is out of right side during start up, or start printer in Serviceman Mode (hold right arrow, down arrow and center/OK buttons while turning printer on), and select wiper replacement to move print head over, then turn the printer off and unplug from power.
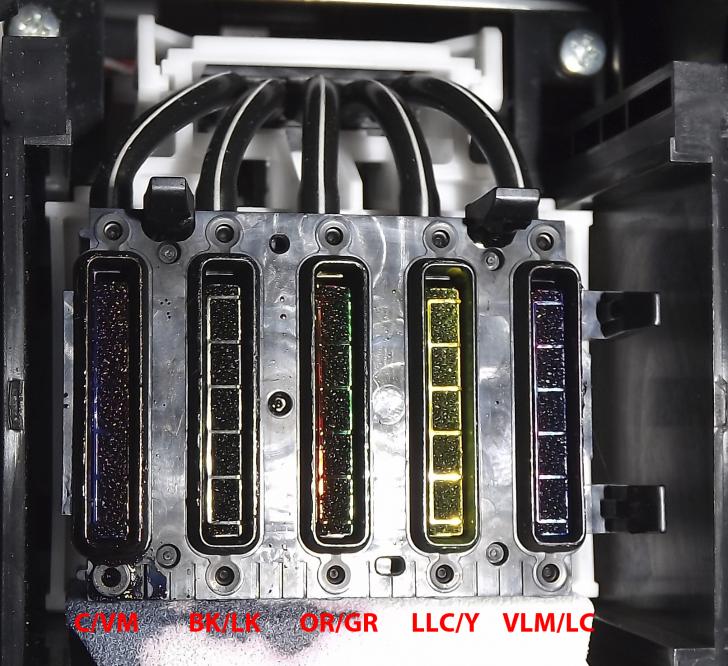
With the print head out of the way, you can see the capping station assembly, which is one large unit that consists of several moving parts, and includes the flushing box, wiper blade, and capping stations (one for each color “pair”). The photo below is from our 7900, which looks the same as the 7890/9890, but with one more capping station for the orange and green channels. In this photo, the flushing box and wiper haven’t been cleaned yet, and have a lot of waste ink build up.
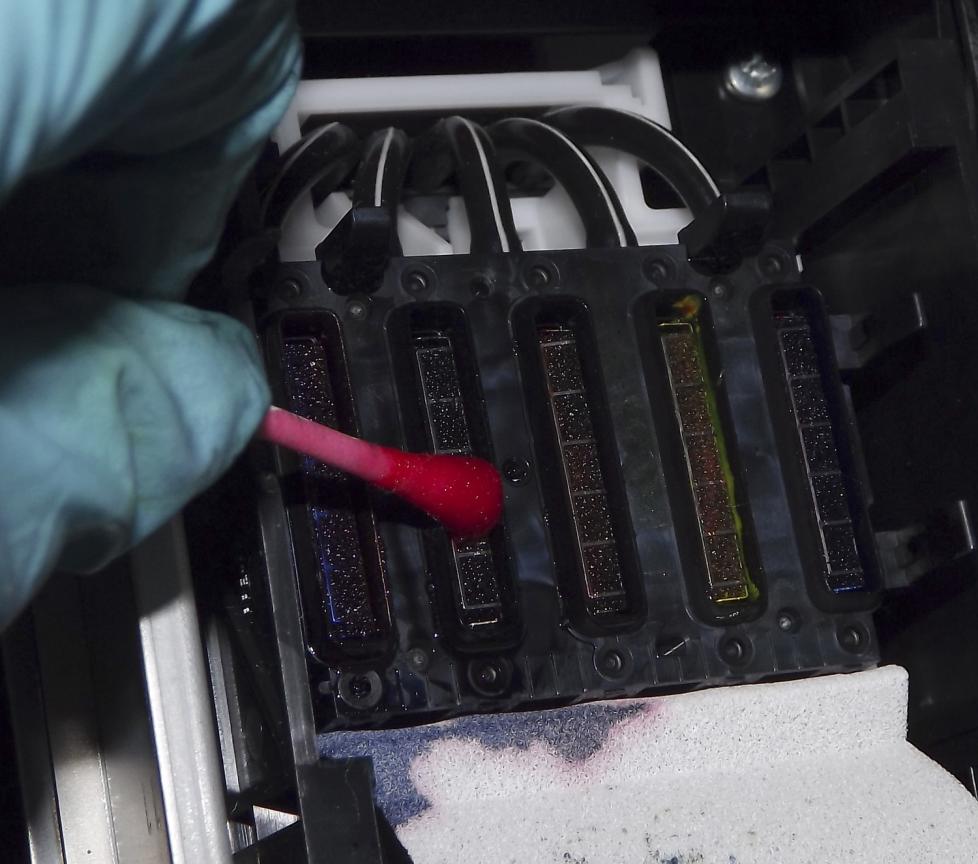
Using Q-tips and PiezoFlush, I gently wiped waste ink build up off the curved wiper blade, wiper blade cleaner and surrounding area.
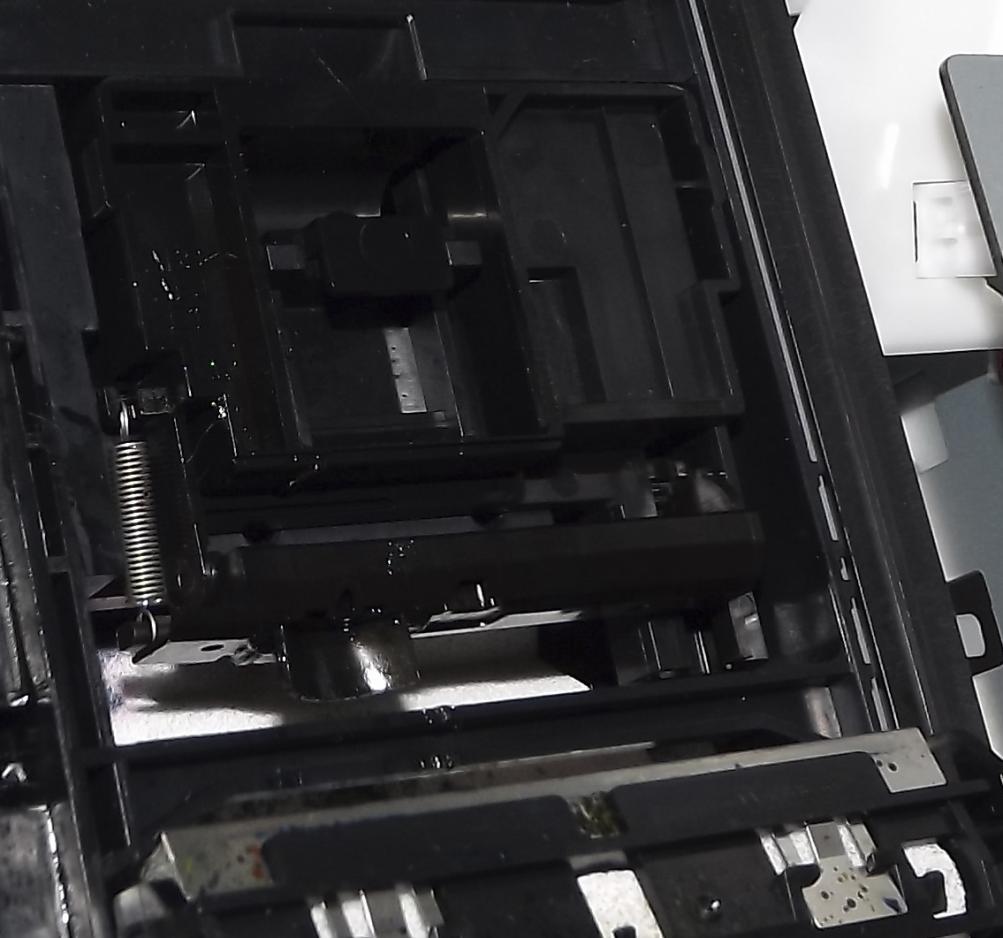
I cleaned the flushing box by gently pulling the plastic frame down to have the whole flushing box visible, then using PiezoFlush and Bounty paper towels, moistened and blotted the pad to remove as much waste ink build up as possible.
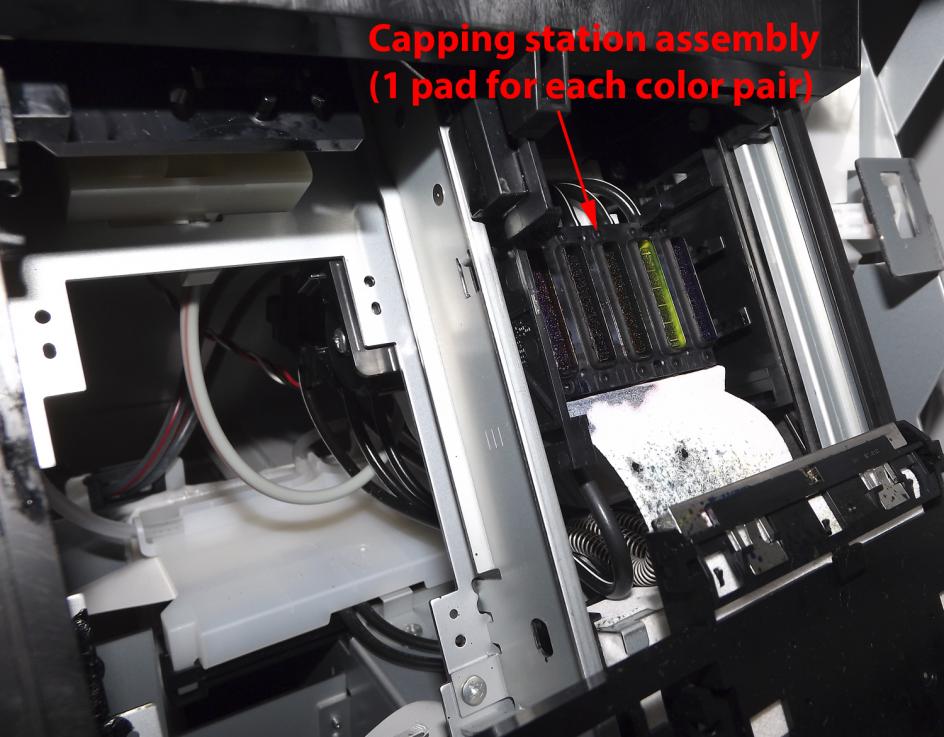
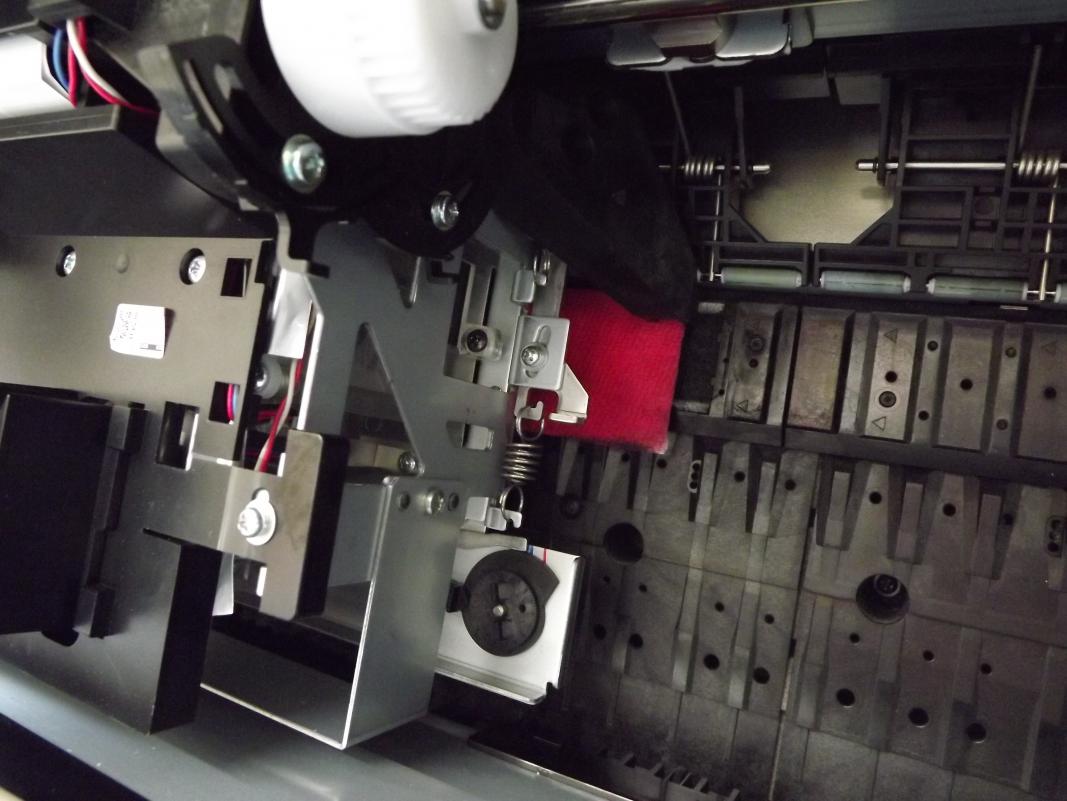
Then, to access the capping stations, I gently pushed the plastic frame up to expose the capping station area underneath (shown below).
Then, I carefully cleaned each capping station area with Q-tips and PiezoFlush to remove waste ink buildup from the inner pad, and outer rubber rim for good flow/suction thru the pad, and good seal between the rim and bottom of the print head.
Thanks for your suggestions.
I have tried everything you have suggested and I even removed the head and forced the piezo clean through the jets.
All the LC jets seem to be clear.
After reassembling the printer to a point where I could test it, and running a few cleaning cycles. The nozzle check pattern returned to it pervious, not working state.
To me, this indicates a head failure or a failure in the circuitry driving the nozzles.
If you have any further ideas, I would welcome them but for now, we will consider our options.
Thanks again.
AL
Over the past few weeks, I have done a lot of tearing apart and investigating inside our 7900. After several years of great results and lots of printing, it developed some stubborn missing nozzles in the LC channel.
I have thoroughly cleaned the printer as we recommend our customers do for the first step (installed PiezoFlush into this channel, cleaned the capping station, flushing box, wiper blade and bottom of the head), and have jacked up the humidifier in the room where this printer lives (now with the dry/cold climate, we’re having to run humidifiers 24/7 to maintain proper levels- low humidity can quickly cause drying and clogging), but there has been no change in the output. After all this, the exact same nozzles were missing, leading me to believe the issue is clogged nozzles in the head. So, I disconnected the ink selector unit (dampers), and removed the print head. I carefully flushed the print head channels using our print head cleaning kit and PiezoFlush solution, and at the same time replaced all the dampers. Everything seemed to go well when I flushed the print head, so I assumed the clog was cleared and reinstalled the print head… but got the exact same results, no matter what I did. Now, after much more research, I’m thinking the head had de-laminated, or there is a blockage behind the print head face plate than can not be cleared. I have even gone as far as to take the head out again and dismantle the head as far as I could to clean it as thoroughly as possible, but none of this changed my results (though I did learn a lot, so it wasn’t a total waste of time). I have one other idea, to help pinpoint the head, but with many other things going on and the upcoming holiday, I expect it’ll be at least a week before I’ll have more time to work on it.
Is it just coincidence that just last week my 9890 had the exact same issue in the same Light Cyan channel. Nozzles missing in the middle third of the check pattern. Not as many as in the first picture but about 3 lines worth. No cleanings or anything else makes this change. So Dana, what did you eventually do to solve this problem on your printer? I didn’t see any follow ups. Other folks concur that this is head death and replacement is the only solution at this point. DX6 head from RO company in TX is $1400, dampers another 100. If anyone can chime in if this is worth that investment vs. a new unit feel free to chime in…
I learned a lot about the internal mechanics of our 7900 when I took it apart and tried to get it clean/working well again, but unfortunately was unable to fix it, and we ended up disposing of the machine. I did a lot of research, and found a bunch of helpful information on the www.myx900.com website, which provides an in-depth look at the print head, and gives a detailed explanation about clogging related to the new head. The print head technology of the 7890/9890, 4900 and 7900/9900 is very different from previous printer models, and has well documented issues of sudden and permanent clogs, that unfortunately don’t respond well to flushing like previous head designs. We have many people who have only ever used Epson inks, contact us for help cleaning/fixing their printers. Some have experienced success using our PiezoFlush solution, but it hasn’t worked in every situation. Yes, new heads for this machine are ridiculously expensive, which is why we decided to get a whole new printer (with extended warranty this time).
It would certainly be great if other users could chime in with their experiences using/cleaning these newer printer models, but if you search online you will find many reports of the same issue you’re experiencing…
Based on my experience with my 7900, when a contiguous section (with multiple complete lines) of a channel suddenly drops, and repeated cleanings result in no changes (or result in further expansion of the block of missing nozzles), you have a failed head. It’s not really a clog; the problem is that the head is no longer working from an electrical/mechanical (i.e. piezo) perspective. You can read about my experience hereon this forum.
I chose to repair my printer myself, since I had the necessary background in working on equipment like this and I had the required tools and service documents. I replaced both the Ink Selector (which contains the 5 dampers) and the head. Like Dana, I found the www.myx900.com website to be extremely helpful, and of course this forum (Dana, Jon) was also helpful! The Ink Selector was sourced from Compass Micro and the new head was purchased directly from Epson.
Some might question the repair as a bad economic decision, but for me it was the right approach. I like the quality of what this printer can produce and I wasn’t interested in changing horses. I also like to know how my tools work, and I feel like now I can tackle anything on this printer based on what I’ve learned in the process. My head failure occurred after 5 1/2 years of excellent service from the printer. With the repair, I am expecting to get at least another 5 years out of it. And because I spent time doing ALL the “post head replace” adjustments as recommended by the service manual, I have a machine that is now optimally tuned and printing like new (maybe even better than new). If you follow this path, I recommend you re-profile the papers you use after replacing the head, since a new head can actually cause a change in color characteristics of the printing system (similar to how a change in Media Type settings can affect the system output).
But I’m fully aware that for anyone running a business with the printer or without the means or time to do the repairs themselves, it is probably best to favor the economics part of the equation and purchase a new printer.
Thanks for your input Dave. Yes, you should re-profile after replacing the print head, because heads will print differently.
I hope you get many years’ of great prints from your self refurbished printer! Also on the myx900 site, replacing the wiper blade on a regular basis is a good way to help keep your head clean and in good working condition!
I have the some issue, middle of cyan not printing. Tried everything and so I called for service and they said I will like need a new head. They also said I can’t keep the old head it goes back to Epson. I’m makings call but anybody know anything about it. Thanks, Greg.


 I’m sorry to hear of the loss. It’s all-to-often with these x9 heads.