Suddenly R3000 Doesn't Print From One of the Cartridges

Just refilled several of the cartridges for my Epson R3000 - for, maybe, the second or third time. Usually everything goes perfectly, but this time there’s a hitch. My VLM DID work for 10 thoroughly saturated prints AFTER refilling, but on the 11th and thereafter isn’t printing at all. On the nozzle check its pattern is completely gone while the other cartridges are printing fine.

[ul]
[li]Ran several cleaning sequences[/li][li]Did multiple nozzle checks[/li][li]Shook the cartridge[/li][li]Tried topping off using the vacuum method, tapping + shaking and reinstalling and still no go. [/li][/ul]

I should mention the printer DOES continue to recognize the cartridge.

[ul]
[li]Did the cartridge chip give out do you think?[/li][li]Do I need to replace the whole cartridge?[/li][li]Have I not prayed well and true to the correct Epson printer gods? [/li][/ul]

Finally, how the heck do your clean the printer heads on this printer?
This link has good info - but doesn’t tell one how to move the printer heads. http://www.piezography.com/support/printhead_cleaning_tips.htm#new_type_carts

Inkjetmall’s own Dana does a great job showing us how to use their kit to clean an Epson printer where you can access the printheads but doesn’t seem to apply to the R3000: http://shopping.netsuite.com/s.nl/c.362672/it.I/id.222/.f

I would buy that kit in a heartbeat if I could figure out how to get my printer to cooperate.

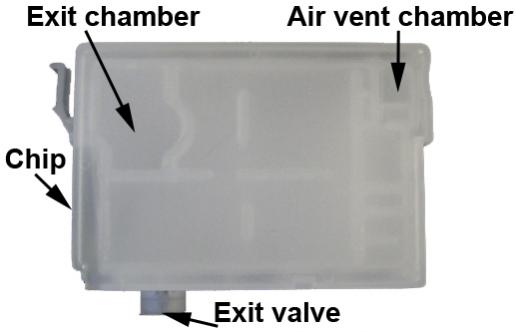
Was the VLM cartridge exit chamber empty when you removed and refilled the cartridge?
Has the ink level of the VLM cartridge gone down since you refilled it and made 10 prints, or is it still at the same level?
Have you checked to make sure the air vent hole is open?
Have you cleaned the printer’s capping station, wiper blade and/or bottom of the print head? If not, I recommend you clean these parts by following our instructions, here: http://www.inkjetmall.com/tech/content.php?133-Printer-Cleaning-and-Preventative-Maintenance

Please let me know so I can help you past this and back to happily printing.
Best regards~ Dana :slight_smile:

Dana Said: Was the VLM cartridge exit chamber empty when you removed and refilled the cartridge?
Response: I’m not sure what this is.

Dana Said: Has the ink level of the VLM cartridge gone down since you refilled it and made 10 prints, or is it still at the same level?

Response: I think so - but I will make better notes after the next cleanse…

Dana said: Have you checked to make sure the air vent hole is open?

Response: Yep.

Dana Said: Have you cleaned the printer’s capping station, wiper blade and/or bottom of the print head? If not, I recommend you clean these parts by following our instructions, here: http://www.inkjetmall.com/tech/content.php?133-Printer-Cleaning-and-Preventative-Maintenance
Response: I just ordered a cleaning kit and will put it to good use when it arrives! Thanks for the link to those instructions! Very helpful, hopefully, lol.

I’ll check in again after I’ve run the course of these awesome tips.

I do worry the VLM cartridge may have run dry in which case I think I’m in for some major trouble. Hopefully your great instructions will help me through that. Honestly, I did not realize just how persnickety this Epson R3000 was! I do now.

Thanks for the additional information.

Our R3000 refillable cartridge instructions include labeled photos of the cartridge parts on the top of the first page, I included one of them below- showing the exit chamber.


Please note- our PiezoFlush small format print head cleaning kit is designed for use directly on the print head. Desktop printer models such as the R2400, R2880, 1400/1430, R1900, R2000, etc… use cartridges that install directly onto the print head- so removing the carts gains access to the print head for easy cleaning. With pro model printers (that have ink lines and dampers between the cartridges and print head), the dampers should ideally be disconnected from the print head in order to flush the print head directly. There have been a few customers who successfully unclogged their R3000 printers by using our print head cleaning kit in the cartridge chamber, and pushing thru the line/damper/head- but I am concerned this could damage the dampers or blow out a connection somewhere if too much pressure is applied. Also, you wouldn’t want to inject PiezoFlush into the cartridge end of your ink line, because it will mix with ink and effect your print output when it reaches the print head. The only way I would suggest trying the print head cleaning kit on an R3000 thru the cartridge chamber would be to GENTLY inject about 1ml of ink (not PiezoFlush) and apply some slight pressure to try unclogging the plug or pushing the trapped air out. By using the same ink that is in the line, you will avoid contaminating the ink line with flush fluid, and the pressure is often what does the trick.

If your VLM cartridge did run dry, and air entered the ink line- this would stop the channel from printing when the air reached the damper and print head, and air will need to be purged to fill the line with ink again for consistent ink flow.

Please let me know how things go, if you have questions, or there’s anything else I can help you with.
Bets regards~ Dana :slight_smile:

Hopefully your warehouse will accept the return of the cleaning kit I ordered yesterday. I have to say, the instructions were a bit confusing as to whether or not this was an appropriate product for this particular printer - but I am so glad to hear directly from you that it is not a good fit. I watched your video twice and somehow talked myself into this being a the right product for the job. I sure don’t want to ruin my printer with kindness! I ordered an alternate product from a different company actually designed for the Epson R3000 so hopefully I will get my hands on what I need, if that’s in fact what I need.

Indeed I may be dealing with an air purge issue and not clogs of any kind. I’ll sweep this forum for info on how to deal with that.

Thanks for your invaluable insights into the intricacies of the awesome but ever so temperamental Epson R3000.

[SIZE=2]We always try to make product descriptions and instructions as clear as possible to avoid confusion, though sometimes information can be over-looked.
On the compatibility tab for the small format print head cleaning kit, it says:
"This particular kit will work with Epson 1400/1430, 800/1800, 1900, R2000, 2100/2200, 2400, 2880 and any of the InkThrift CL supported desktop printers. Basically, if the Epson cartridge fits right on top of the print head, this will work!"

and the first part of the "Flush print head using our PiezoFlush print head cleaning kit: on our printer maintenance/cleaning article I directed you to above says:
“1. Remove cartridges (desktop model printer) or disconnect dampers (Pro model printer) to access the print head- you should write down the cartridge or damper order before disconnecting from the head, to know which channel you need to clean and how to put it back together after cleaning. There will be a 1/2” plastic point sticking up for each ink channel in the print head- these points are where the cartridges or dampers connect with the head."
[/SIZE]

I will update the instructions that are on the print head cleaning kit page, and that come with the cleaning kit to add the first paragraph that is included above, that specifies the cleaning kit should be used directly on the print head.

Please give me the link to the R3000 specific cleaning kit you purchased, as I’d like to check it out to know better if this will help you or not. As I mentioned before, if you’re dealing with air in the line, you can try injecting a small amount of ink into the ink line from the cartridge end to help purge air- or do an initial fill cycle thru the Adjustment Program.

Thanks- Dana :slight_smile:

I know you DO try to be as clear as you can with your info, and this is appreciated. I’m in the information-design business and understand how info sometimes needs to be chunked apart and/or highlighted to help people assimilate its messaging in ways beyond the just the words used. Some of us are very visually oriented and need white space, color cues and other design methods to ‘see’ what the words are telling us in order for the message to sink in. I believe Epson should have done a much better job of putting out there the sheer importance of how to properly maintain and run this printer. I appreciate hugely the pains you take to help us fix our issues! I also appreciate the information other users post to help other who encounter similar challenges. It is a part of the online community experience that is just so wonderful.

Following another thread within this forum about air in the lines, I found some carefully constructed instructions from another user who appears to have reached a very similar point in his journey with the challenges of this particular printer and ended up solving his issue by referring to the technician’s manual for this machine and some of his own hunches. The manual is available in this link for about $12 and is an instant download. http://www.2manuals.com/product_info.php?products_id=1376

The cleaning kit I ordered is coming from here: InkRepublic - P800 Refill, P600 CIS, P600 Refill, R2000 CIS, Artisan 1430 CIS, R2880 CIS, 3880 Refill, 3800 Refill, R1900 CIS, R2400 CIS, R1800 CIS, R800 CIS, Artisan 50 CIS
It does specifically claim that it can be used on this particular model.

My goal now will be to run this cleaning kit through the two clogged channels and see what results. If I’m still at a no-go, then Ill assume I’m dealing with air and proceed accordingly. You’ll find a correspondence you had with a user named Pgross who delineated his solution. He sounds like me - at the point of ‘nothing to lose’. http://www.inkjetmall.com/tech/showthread.php?183-R3000-LLK-ink-not-flowing/page3

He ended taking his R3000 apart and working with trying to get the air out of some of his lines. He, like me, did not heed the subtle warnings about the problems to be had not policing one’s cartridges better. My hope is I find success like Pgross and fix my issue resulting in a much clearer working knowledge of this machine. Unlike you and your skills, Dana, this is not at all within my normal bailiwick. I design pretty things, I don’t tend to be mechanically inclined…though by now I bet this is laughably obvious! Thanks for your help!

Yes, we understand information has to be presented in many places and ways, and visual demonstration is always best to help people understand a process than written instructions and still photos.
I totally agree that Epson should be more proactive about helping people maintain their printers, but you have to understand, it’s in their best interest for the user to pay for service or buy a new printer every few years, than have users personally maintaining and using the same printer for several years. That’s where we come in- to help you learn techniques to keep your printer in top working condition and lasting a long time, which the manufacturer won’t tell you (and doesn’t want you to know).

I also agree the online community support is wonderful, and is a helpful/efficient way to read other people’s experiences, read/share interesting things people are doing, access information documents we provide, and is one location to ask any questions you may not find an answer for- then the information is available for others to benefit from :slight_smile:

PGross’s post on how he got his R3000 working again is detailed and helpful (he successfully got his printer working again). I plan to do more testing (especially in regards to injecting ink or cleaning fluid thru the cartridge end of the line- and how that effects the dampers), then clarify and write instructions for a similar procedure so people can confidently/successfully clean and fix their own printers.

I suspected this is the other cleaning kit you purchased. This kit is essentially the same as ours, but includes a different cleaning solution. Although the product page says it works on the R3000 printer model, if you look at the illustrations and instructions- the cleaning kit is to be used directly on the print head, just like ours. The R3000 is the only model listed that has internal ink lines and dampers- all the other models they list are desktop models that you can easily access the print head for cleaning by removing ink cartridges. With a pro model printer- you need to disconnect the dampers to access the print head for direct cleaning. I suspect it was an oversight on their part to list the R3000 as a supported model with this print head cleaning kit, as they didn’t include information for accessing the print head with this model.

When you receive the cleaning kit, it may be best to start by drawing 1ml of VLM ink into the syringe, connecting the cleaning cart to the VLM cartridge channel, and gently inject 1ml of ink into the line. Don’t apply too much pressure if there’s strong resistance, but with light pressure and a small amount of fluid you may hear a slight spurt from the print head end (the blockage opening up), then reinstall the cartridge, do 1-2 regular cleaning cycles and print a nozzle check to see how things look before taking apart your printer. Have you already clean your printer’s capping station, wiper blade and bottom of the print head by following the instructions I directed you to?

Please keep me posted and let me know if you have further questions, or there’s anything else I can help you with.
Best regards~ Dana :slight_smile:

You bring up some excellent points about Epson’s internal motivations to keep us ‘in the dark’. I tend to agree with you on that. Thankfully there are companies like yours and people like you to help us circumnavigate the system a little through these inks and support info. So THANK YOU for that!!

I am still waiting for this cleaning kit to arrive but in the meantime I took the manual I downloaded and opened up my printer some to see what’s what. For kicks I tried sending some VLM ink through the VLM cartridge egress out into the line. Fully expecting to see some of the ink come through the head (I ended up sending probably an extra 10–12ml) nothing showed up. I’m, like, ???. Then I ran out of ink so I had to discontinue that possibly insane and certainly spendy activity.

I put the thing back together and fired it up. Print great but with continued lack of VLM. I tried figuring out from the manual pix and Peter’s instructions how he accessed the lines to flush. It seems one is not supposed to touch that printer head assembly. Even the technicians are warned against it in the manual. Any insight you have on this issue, Dana will be appreciated and put to immediate use!

In the meantime I’ll do what you’ve suggested with this cartridge-based cleaning kit that’s headed my way.

I am perhaps delusionally optimistic that I’ll get the VLM to print again. I sure hope so. It would be a feather in my cap if I do! Thanks for your help.

If you don’t have the cleaning kit yet, how did you inject 10-12ml of ink into the VLM line? I am concerned that you injected this much ink into the line (I only recommend trying 1-2ml), and that nothing came out the print head end. Without measuring exactly, I suspect the ink line probably holds about 12-15ml…

I expect I’ll have to open up our R3000 in the near future to take photos and learn about the printer mechanics better to be able to instruct people how they can work on and clean their own machines. I assume it’s built very similar to the 3800/3880, which I have worked on before.

Please keep me posted, and I will try to help as best as I can from afar.
Best regards~ Dana :slight_smile:

Well, it may be nuts, but I just put some VLM ink into one of my InjetMall cart refill syringes and placed that over the cartridge nozzle directly and gently squirted in. I read somewhere in one of these info threads that sometimes you can unjam a line using some more ink. I may have created a gap in the ink line by letting the VLM cartridge accidentally run dry, which I can picture, right? As this is a ‘gravity fed’ system, the remaining ink in the line will flow through and print until it’s out more or less, right? Which means you’ll have a big airy gap in the line until new ink slowly draws in and replaces that. The thought was to push out the air and fill the line in with ink. You know, unless the air has caused residual ink to dry and clot. Then you’re in a pickle.

And I may be smack dab in the middle of said pickle.

I received my cleaning kit as well as my new inks from you all - so when I get brave or find some booze, I’ll have at it. I have to be in the right mood for this because I have to be willing to admit I might fix the thing or ruin it for all time. It’s a $700 proposition one has to be prepared to accept, hence the actual or liquid courage bolstering.

I wish you would open up your R3000 right now. I have a lot more faith in you about this stuff than I do me! I know, if I wreck mine I’ll send it to you so you can do a proper autopsy.

So, yesterday afternoon I decided to investigate our R3000. I discovered each line holds about 2ml of ink from the cartridge to the damper- so if you pushed 10-12ml and it didn’t come out the other end, I’m wondering where it went…
I also discovered how to replace the individual dampers in the ink selector unit, and how to access/flush the print head using our print head cleaning kit. I will be putting together an instruction document with the photos I took to help people do the same, and will let you know as soon as I’m done with them. The intention for writing and making these instructions available is so people can try to work on and possibly repair their own printers, but the user has to accept full responsibility for working on their own machine, reading/following the instructions carefully, and understanding we can not guarantee that you can fix your own printer (but we will help you try if you are willing/able), and there is always a risk of damaging something or not putting it back together correctly if you are not careful and paying attention- any damage you may cause to your printer is not our responsibility. We offer LOTS of helpful information, but it’s up to you as the user to follow the instructions carefully/correctly to have successful results- so proceed at your own risk. With that said- machines can be a huge and scary mystery, but many things can be done yourself provided you give yourself plenty of time (don’t rush), carefully read/follow the instructions, and pay attention to what you’re doing (I recommend drinking AFTER, not before working on your printer). Repairing your own printer is hugely empowering (not to mention all the $$$$ it saves).

I’ll be in touch with more info ASAP, though it likely won’t be until next week at the soonest (I always have a LOT going on).

All the best~ Dana :slight_smile:

Hi Dana and MartiMu, I have been following this thread (a model of cordial cooperation) with interest, though I do not own an R3000. A few exchanges back it was mentioned that Epson discourages “bad touching” around the print head. I also know that there are dire warnings against touching the ribbon data cables communicating with the print heads on all Epson inkjets. Dana (when you get the chance to respond) could this be due to electrostatic vulnerability? Is it advisable to wear an electrostatic discharge wrist strap when poking around in these printers? Living in a low humidity region and having suffered a fatal “cartridge not found” on a 1400, I’m suspicious. Cheers!

Excellent question Don. My understanding is the concern/problem is both static shock and oils from your hands that could effect/damage the electrical cables and/or print head.
With that said, grounding yourself and/or wearing an electrostatic discharge strap and rubber gloves are good whenever working on your printer (electrical shock and oils can damage just about any electrical component- so this doesn’t only apply to printers and print heads). There are many small and sensitive parts inside any machine, and care should always be taken when working on a machine to prevent avoidable damage or mess.

I hope this helps, all the best~ Dana :slight_smile:

Howdy Don! Welcome to the printer party! Thanks for the note about wearing a wrist strap. I think I’ll go get one.

And Dana, you’re Da Bomb! I will hold off doing ANYthing more to the innerds until I see what you put together. I’m starting to believe this is going to go well for me now that I have you on the case. And I wasn’t kidding about sending you my printer if I end up ruining it. Might be nice to have one you can experiment with down the line. Except you’re really instilling a hope in me. So I’ll stand by and await your step-by-steps.

I did just do a print head cleaning as per your instructions here: http://www.inkjetmall.com/tech/content.php?133-Printer-Cleaning-and-Preventative-Maintenance
Went through each step carefully and deliberatively.

I flushed approved cleaning solution through a dummy cartridge situated in the VLM slot and easily mopped it up using the folded paper towel method adjusting the position of the print head as I went so as not to oversaturate an area. I did draw back gently on the syringe plunger to loosen anything that might be stuck several times in case that’s been the issue.

Then I filled the brand new VLM replacement cartridge using the initial vacuum method I ordered form you all and set that into the slot.

I powered up and tested. Still nothing from the VLM!

Ran some cleans - nothing.

Powered back down and carefully flushed about 1.5ml of VLM ink through a different dummy cartridge to sort of re-prime the line, get it full of the proper ink. Again mopping carefully up as I went.

Finished. Made sure I hadn’t overdone anything with the pressure. Powered back up.

Ran a dozen test sheets through printing JUST from the VLM nozzle and received 12 beautifully pristine - not a mark on them - pieces of paper out the front. I used the jog here to get the proper image. http://www.marruttusa.com/printer/support/epson-stylus-photo-r3000-help.php#purge
I should likewise mention that when I run a nozzle test all 7 other nozzles print A+ perfectly every single time.

Sigh.

So now I have to move on to other things. I won’t be restocking prints for my art show next week. I had no idea my images were so dependent on the VLM color, but boy do they look flat without it.

I will wait for your instructions for replacing dampers and such mentioned above in case I’ve got a bad one. I’m bummed. But who knows, maybe this last ditch effort will turn out to have been the right solution all along.

Godspeed your nimble brain and fingers!

Thank you!

–Marti

UPDATE
After using a dummy cartridge and the syringe that ships with it filled with cleaning fluid and following the directions I have cited elsewhere throughout this thread (some from Dana some from another dude in Jersey) I am pleased as punch to report that my R3000 is working as good as new again!! Yes, I am a Happy Camper!! So thank you to Dana and her wonderful, thoughtful responses and insights as well as to all else who take the trouble to post info my printer does not have to be turned into a 25 pound paper wieght or be autopsied for science. Joy! Joy!

I’m packing to printing this sort of image flawlessly!
http://www.happyart.com/product/11x14-art-print-the-quantum-of-love-its-everywhere/

Just in time to make some $ with holiday sales!!

Fantastic news!! :slight_smile:

Thanks for sharing your experience, and I’m very happy to hear with the help of this community support system, you have successfully resolved your problem and can get back to making art!

I briefly checked out your website, and enjoy the positive feel of your paintings- nice work!

Best regards and happy printing~ Dana :slight_smile: